Step-by-Step Guide: Setting up and Using VPN on Mac OS X

If you want to connect to a VPN on your Mac OS X, you will need to go through a few simple steps. First, you need to enable the VPN client on your Mac. You can do this by going to the System Preferences and selecting the Network icon. From there, you can choose the VPN option and click the “+” button to add a new VPN connection.
After you have added a new VPN connection, you will need to enter the settings for the VPN. This includes the server address, the type of VPN you will be using (such as L2TP, PPTP, or IPSec), and the authentication method. You may also need to enter a username and password if your VPN requires it.
Once you have entered all the necessary settings, you can choose how you want to connect to the VPN. You can either connect manually or use the “Connect on Demand” mode, which will automatically connect you to the VPN whenever you access a network that is not in your list of trusted networks.
Finally, to start using the VPN, you will need to sign in with your username and password. If your VPN is supporting the Kerberos authentication system, you may need to sign in with a separate Kerberos password.
After you sign in, your VPN connection will be established, and you will be able to browse the internet securely and privately. You can leave the VPN connected for as long as you like, or you can disconnect when you’re done using it. To disconnect, simply click on the VPN icon in your menu bar and select “Disconnect.”
In addition to the IPsec and L2TP modes, Mac OS X also supports the Cisco IPSec protocol, which is commonly used for VPN connections. To set up a Cisco IPSec VPN on your Mac, you will need to download and install the Cisco VPN client software. Once installed, you can add a new VPN connection in the Network settings and choose Cisco IPSec as the VPN type.
Setting up and using a VPN on Mac OS X is a straightforward process that can provide you with a secure and private browsing experience. By following the step-by-step guide outlined above, you can easily connect to a VPN and enjoy all the benefits it has to offer.
Benefits of Using a VPN on Mac OS X
Using a VPN on Mac OS X offers several advantages:
- Enhanced Security: By using a VPN, you can secure your internet traffic by encrypting it, making it more difficult for hackers and other unauthorized individuals to intercept your data. This is especially important when using public Wi-Fi networks, as they are often not secure.
- Privacy Protection: A VPN allows you to maintain your online privacy by masking your real IP address and replacing it with the IP address of the VPN server. This makes it difficult for websites, advertisers, and other third parties to track your online activities.
- Access to Restricted Content: With a VPN, you can bypass geo-restrictions and access content that may be blocked or unavailable in your location. This includes streaming services, social media platforms, and websites that are otherwise restricted.
- Safe Remote Access: If you need to connect to your home or office network while traveling or working remotely, a VPN provides a secure and encrypted connection. This ensures that your data is protected when accessing sensitive information or files.
- Easy Setup and Use: Setting up and using a VPN on Mac OS X is straightforward. Once you have chosen a VPN provider and signed up for their service, you will generally need to download and install the VPN client app. From there, you can select your preferred VPN protocol (such as IPSec or OpenVPN) and connect to a VPN server with just a few clicks.
In conclusion, using a VPN on Mac OS X provides a range of benefits, including increased security, privacy protection, access to restricted content, safe remote access, and easy setup and use. It is an essential tool for anyone concerned about their online privacy and security.
Choosing a VPN Service for Mac OS X
If you are using a Mac OS X operating system and need to connect to a VPN, it is important to choose a VPN service that supports Mac OS X. Not all VPN providers offer support for Mac, so be sure to check that they specifically mention compatibility with this operating system.
When selecting a VPN service for Mac OS X, consider the following:
- Features: Look for a VPN that offers the features you need. This could include ad-blocking, malware protection, or the ability to connect multiple devices simultaneously.
- Server locations: Check if the VPN has server locations in the countries you need to connect to or if it has a wide range of servers worldwide.
- Logging policy: Look for a VPN that has a strict no-logging policy to ensure your online activities are not being tracked or monitored.
- Speed and performance: Consider the speed and performance of the VPN. You want a service that does not sacrifice speed for security.
- Price: Compare the pricing plans of different VPN services to find one that fits your budget.
Once you have chosen a VPN service, you will need to download and install their VPN client for Mac OS X. Most VPN providers offer a separate client for Mac that you can download from their website.
After installing the VPN client, open it and sign in using your VPN account credentials. The exact steps may vary depending on the VPN service you are using, but generally, you will need to sign in with your username and password.
Next, you will need to configure the VPN connection settings. This includes selecting the VPN protocol, such as IPSec or OpenVPN, and choosing the connection mode. The most common mode is “Automatic,” which will automatically connect you to the best server available.
Finally, click on the “Connect” button to establish a VPN connection. You can usually enable or disable the VPN connection from the menu bar at the top of your Mac’s screen. When the VPN is connected, your IP address will be masked, and your internet traffic will be encrypted, providing you with a secure and private browsing experience.
By following these steps, you can easily set up and use a VPN on your Mac OS X device. Enjoy the benefits of a protected and anonymous online presence.
Setting up VPN on Mac OS X
In order to set up a VPN on Mac OS X, you will need to follow a separate set of instructions depending on the type of VPN connection you want to establish.
Setting up an IPSec VPN connection
To set up an IPSec VPN connection, you can use the built-in VPN client on Mac OS X. Here is how you can enable and use it:
- Click on the Apple menu in the top-left corner of the screen and choose “System Preferences”.
- Select the “Network” option.
- Click on the “+” button at the bottom left of the network connections list to add a new connection.
- Choose “VPN” as the interface, “IPSec” as the VPN type, and enter a connection name.
- Enter the server address, account name, and select the authentication settings that your VPN provider supports.
- Click on the “Advanced” button to configure additional settings, such as enabling split tunneling or using a proxy.
- Click on “OK” to save the settings.
- Select the new VPN connection from the network connections list and click on the “Connect” button to establish a VPN connection.
Setting up a L2TP/IPSec VPN connection
If you want to set up a L2TP/IPSec VPN connection, you can use the built-in VPN client on Mac OS X. Here is how you can do it:
- Follow steps 1 to 5 from the previous section to create a new VPN connection.
- Choose “L2TP over IPSec” as the VPN type.
- Enter the server address, account name, and select the authentication settings provided by your VPN provider.
- Click on the “Advanced” button to configure additional settings, such as enabling split tunneling or using a proxy.
- Click on “OK” to save the settings.
- Select the new VPN connection from the network connections list and click on the “Connect” button to establish the VPN connection.
Setting up a VPN on Mac OS X is possible with various protocols and configurations. Whether you need to connect to your home network or access a secure network while traveling, following the steps above will help you configure and connect with the VPN client on your Mac.
Step 1: Open System Preferences

To set up and use VPN on your Mac OS X, you will need to access System Preferences. Here’s how:
- Click on the Apple menu in the top left corner of your screen.
- From the drop-down menu, select “System Preferences.”
This will open the System Preferences window, where you can access various settings for your Mac OS X.
Step 2: Click on Network
After launching the System Preferences menu on your Mac OS X computer, you will need to select the Network option. This will allow you to start setting up and configuring your VPN connection.
Once you have clicked on Network, you will see a menu with several options. To begin, select the ‘+’ button to create a new network connection. This will open up a list of available network connection types.
One of the options you will see is VPN. Select this option to proceed with setting up your VPN connection. You may be prompted to enter additional information, such as the VPN client you will be using.
Depending on the specific VPN protocol you will be using, you will need to choose the appropriate option. For example, if you will be using IPsec or Kerberos, select the corresponding option from the list.
After selecting the correct VPN protocol, click on the Create button to proceed. You will then be prompted to enter the necessary configuration details for your VPN connection. This will include entering the VPN server address and any required authentication credentials (e.g., username and password).
Once you have entered all the necessary information, click on the Apply button to save your settings. You can now enable your VPN connection by selecting the VPN menu from the top menu bar on your Mac desktop.
From the VPN menu, you can choose to connect to your VPN using different modes. The available modes will depend on the capabilities of your VPN client and the VPN service you are using. It is possible to connect to your VPN using a password, a separate network sign-in, or with a supporting smart card.
Once you have selected the desired mode, your Mac OS X computer will establish the VPN connection. You can confirm the status of your connection by checking the VPN menu. If successfully connected, you will see the VPN connection status displayed.
Step 3: Click on the “+” button
To connect to a VPN, you will need to have a VPN connection set up on your Mac OS X. In this step, we will show you how to create a new VPN connection using the IPsec protocol.
1. First, open the “Network” settings on your Mac. You can do this by clicking on the Apple menu at the top-left corner of your screen, selecting “System Preferences,” and then clicking on “Network.”
2. Once in the “Network” menu, click on the “+” button below the list of network connections to create a new connection.
3. A new popup window will appear. In this window, you will need to select “VPN” as the interface and “IPsec” as the VPN Type.
4. Once you have selected the necessary settings, click on the “Create” button to create the new VPN connection.
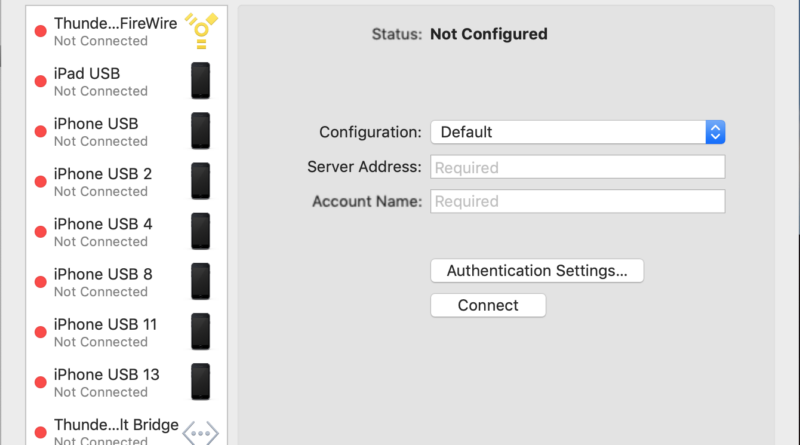
5. In the next window, you will be prompted to enter the VPN server address and your account details. This will include the server address, your account username, and your account password. Enter these details in the appropriate fields.
6. After entering the necessary details, click on the “Authentication Settings” button to configure additional authentication settings if required. This will allow you to set up a separate password or use modes such as Kerberos.
7. Once you have configured the authentication settings, click on the “Apply” button to save the settings and enable the VPN connection.
8. You can now click on the “Connect” button to establish a connection to the VPN server. Your Mac OS X will start connecting to the server using the specified settings.
9. If you want to disconnect from the VPN, simply click on the “Disconnect” button in the Network menu.
By following these steps, you can easily set up and connect to a VPN on your Mac OS X using the IPsec protocol. Remember to select the appropriate authentication settings and enter the necessary server and account details to start using the VPN connection.
Step 4: Select VPN as the Interface
After completing the previous steps, you will now need to select VPN as the interface to enable the VPN connection on your Mac OS X.
- Click on the Apple logo in the top left corner of your screen to open the drop-down menu.
- From the menu, select “System Preferences” to open the settings.
- In the System Preferences window, click on the “Network” icon to access network settings.
- In the Network settings, you will see a list of available network interfaces on the left side of the window. Click on the “+” button at the bottom left corner to add a new interface.
- A pop-up window will appear, showing a list of interfaces. Choose “VPN” as the interface type.
- Next, you will need to select the VPN protocol you want to use. There are two possible options:
- If you are using a VPN client provided by your workplace or school, select the “L2TP over IPsec” option.
- If you are using a separate VPN client or a VPN service supporting the L2TP, PPTP, or Cisco IPSec protocols, choose the “Cisco IPSec” option.
- In the following step, you will be asked to enter the VPN server’s IP address or hostname. You will need to obtain this information from your VPN provider.
- Once you have entered the server information, click on the “Authentication Settings” button to configure the VPN authentication settings.
- In the Authentication Settings window, you will need to enter your VPN username and password. If your VPN server uses Kerberos or certificate-based authentication, select the appropriate options and provide the necessary information.
- After configuring the authentication settings, click “OK” to return to the Network settings window.
- Finally, click on the “Apply” button to save the changes and enable the VPN connection on your Mac OS X.
Now you are ready to connect to the VPN with the selected settings. To start a VPN connection, click on the “Connect” button in the Network settings window.
Step 5: Choose the VPN Type
Once you have configured the basic settings for your VPN connection, it’s time to choose the VPN type that you want to use. Mac OS X provides three options: L2TP, PPTP, and Cisco IPSec. Each of these VPN types has different capabilities and requirements, so it’s important to choose the one that best suits your needs.
L2TP:
L2TP (Layer 2 Tunneling Protocol) is a widely used VPN protocol that provides a secure connection between your Mac and the VPN server. It offers a high level of security and is compatible with most operating systems, making it a popular choice for both personal and business use.
PPTP:
PPTP (Point-to-Point Tunneling Protocol) is another common VPN protocol that is widely supported by most operating systems, including Mac OS X. It offers a relatively simple setup process and is easy to use, but it may not provide the same level of security as L2TP.
Cisco IPSec:
If you are connecting to a network that uses Cisco VPN technology, you can select the Cisco IPSec option. This VPN type requires additional settings, such as the server address, group name, and group password. It may be necessary to contact your network administrator to obtain these details.
To choose the VPN type, go to the Apple menu in the top-left corner of your screen, select “System Preferences”, and then click on “Network”. In the Network window, click on the “+” button at the bottom-left to add a new VPN connection. From the Interface dropdown menu, select the VPN type you want to use.
After selecting the VPN type, provide a descriptive name for the connection in the Service Name field. You can also optionally enable the VPN status in the menu bar to quickly connect or disconnect from the VPN network.
Once you have chosen the VPN type and configured the necessary settings, click on the “Advanced” button to customize additional options, such as using the VPN for only specific websites or using a proxy server in combination with the VPN.
Step 6: Enter VPN Server Address
After enabling the VPN connection on your Mac OS X, you will need to enter the VPN server address to establish a connection. This address will be provided by your VPN service provider or system administrator.
To enter the VPN server address, follow these steps:
- Click on the Apple menu in the top left corner of your screen.
- Select “System Preferences” from the drop-down menu.
- In the System Preferences window, click on the “Network” icon.
- In the Network window, select the VPN connection you previously set up from the list on the left side.
- Click on the “Advanced” button in the bottom right corner.
- In the Advanced settings window, click on the “VPN” tab.
- Next to “VPN Options,” click on the “PPP” button.
- In the PPP settings window, enter the VPN server address provided by your VPN service provider or system administrator.
- Click on the “OK” button to save your changes and close the windows.
Once you have entered the VPN server address, you can now connect to the VPN network. To do this, simply click on the “Connect” button in the Network window or click on the VPN connection icon in the menu bar and select “Connect.” You may be prompted to enter a username and password if required by the VPN server. Enter your credentials and click on “Connect” to establish the VPN connection.
Note: If your VPN service provider or system administrator uses different connection modes, such as IPSec or Kerberos, the steps to enter the server address may vary. Consult your VPN provider’s documentation or contact your system administrator for instructions on how to set up a VPN connection using these modes.
Step 7: Enter your VPN Account Username and Password
Once you have successfully chosen and connected to a VPN server using the IPsec protocol, you will need to enter your VPN account username and password to establish the connection.
To do this, go to the menu bar at the top of your Mac’s screen and select the “VPN” option. From the drop-down menu, choose “Connect” to start the connection process.
A separate window will appear, showing the available network connections. Select the VPN connection you have set up, and click on the “Connect” button.
In the prompt that appears, enter your VPN account username in the designated field. This is the username provided by your VPN service provider. Next, enter your password in the corresponding field.
Note: If you are using a VPN service that supports Kerberos authentication, you may need to use your Kerberos client username and password instead. Consult your VPN service provider for more information on how to enable this mode.
Once you have entered your username and password, click the “Connect” button to establish the VPN connection. Your Mac OS X will then proceed to authenticate and connect to the VPN server using the provided credentials.
If you wish to save your VPN account username and password for future use, you can select the “Remember this password” option. This can be convenient if you need to regularly connect to the same VPN server.
Note: For additional security, it is recommended to leave this option unchecked. This will require you to enter your username and password each time you connect to the VPN, providing an extra layer of protection for your account.
Step 8: Click on the Advanced button
To continue setting up your VPN connection on Mac OS X, you will need to click on the Advanced button. This will allow you to configure additional settings for your VPN connection.
Once you click on the Advanced button, a new window will appear with various tabs and options. In this window, you can choose the setting that best suits your needs for connecting to the VPN.
One important setting to consider is the connection mode. Mac OS X supports two separate modes – IPsec and PPTP. The IPsec mode provides a more secure connection, while the PPTP mode is faster and easier to set up.
If you are using a VPN client that supports both IPsec and PPTP, you can select the mode you prefer. However, if your VPN provider only supports one mode, you will need to choose the appropriate setting.
Additionally, you may need to enable other options depending on your VPN provider’s requirements. For example, some VPNs may require Kerberos authentication or other advanced settings to connect properly.
Once you have selected the appropriate settings, click on the OK button to save your changes and return to the main VPN menu. You are now ready to connect to your VPN using the settings you have configured.
Step 9: Configure Advanced VPN Settings
After setting up and connecting to a VPN network on your Mac, you may want to configure some advanced settings to enhance your VPN experience. Here are a few steps on how to do that:
1. Open the VPN settings menu
Start by clicking on the Apple menu at the top-left corner of your screen. Then, select System Preferences from the drop-down menu. In the System Preferences window, click on the Network icon.
2. Choose the VPN connection you want to configure
In the Network window, select the VPN connection that you want to configure from the list on the left-hand side. This will display the VPN settings for that specific connection.
3. Enable additional VPN modes
If your VPN service supports additional VPN modes, you can enable them by clicking on the Advanced button in the VPN settings window. From there, you can choose the desired mode, such as IPsec, Kerberos, or other supported modes.
4. Configure advanced settings for the selected VPN connection
If you want to configure more advanced VPN settings for the selected VPN connection, click on the Advanced button in the VPN settings window and then click on the Options tab. Here, you can configure settings such as whether to automatically reconnect if the VPN connection is lost, and whether to use certificate-based authentication or a separate password for the connection.
5. Save your settings and connect to the VPN
Once you have configured the advanced VPN settings to your liking, click on the Apply button to save your changes. You can then click on the Connect button to establish a connection with the VPN network using your newly configured settings.
By following these steps, you can customize and enhance your VPN experience on your Mac by configuring advanced settings that best suit your needs.
Step 10: Click on the OK button

Once you have entered all the necessary settings for your VPN on Mac OS X, you will need to click on the OK button to save your changes and close the network settings.
After clicking on the OK button, you can start using your VPN connection. To connect to the VPN, simply go to the Apple menu and select the “System Preferences” option. From there, choose the “Network” icon and find the VPN connection you created earlier. Click on the “Connect” button to establish the VPN connection.
When you click on the Connect button, you may be prompted to enter your username and password. This is the same username and password you use to sign in to your Mac OS X account.
If you want to enable additional VPN settings, such as connecting through a separate client or using a different VPN protocol, you can do so by navigating to the “Advanced” tab in the network settings menu. From there, you can choose the desired settings and click on the OK button to save the changes.
It’s important to note that not all VPN providers support all VPN protocols. The available protocols will depend on the VPN service you are using. Some common VPN protocols include IPSec, OpenVPN, and Kerberos.
Once you have successfully connected to the VPN, you can start using it to browse the web, access blocked content, and protect your online privacy.
Step 11: Click on the Apply button
To finalize your VPN settings, click on the Apply button. This will save your changes and make the necessary adjustments to your Mac OS X operating system. Once you click apply, your VPN connection will be enabled and ready to use.
By clicking Apply, you are confirming that you want to apply the changes you made in the VPN settings. This step is important because it ensures that any changes you made, such as selecting the IPsec protocol or choosing a specific network mode, will take effect.
If you have multiple VPN connections, clicking Apply will apply the changes to the currently selected connection. If you want to make changes to a different VPN connection, be sure to select it before clicking Apply.
Once you click Apply, you will see a confirmation sign that indicates your changes have been successfully applied. You can now start using your VPN connection to connect to a remote network securely.
If you enable the “Connect on Demand” mode, your VPN connection will automatically start whenever you connect to a network that is not on your home network. This is a convenient feature as it ensures that your online activities are always secure, even when you are connecting to public Wi-Fi networks.
Lastly, if you want to connect to your VPN with a client supporting the Kerberos password, you will need to enable the “Use separate password for IPSec and Kerberos authentication” option. This is an additional security measure that provides an extra layer of protection for your VPN connection.
Step 12: Connect to VPN on Mac OS X
To connect to a VPN on Mac OS X, follow these steps:
- Start by supporting a VPN connection with the proper settings that you will need. These include the server IP address or domain name, your username, and password.
- On your Mac, go to the Apple menu and select “System Preferences”.
- In the System Preferences window, click on the “Network” icon.
- In the Network window, click on the “+” button in the bottom-left corner to add a new network connection.
- In the “Interface” dropdown menu, select “VPN”.
- In the “VPN Type” dropdown menu, choose the VPN protocol you will be using, such as IPSec or L2TP over IPSec.
- In the “Service Name” field, enter a name for the VPN connection, such as “Home VPN” or “Work VPN”.
- Click on the “Create” button.
- In the “Server Address” field, enter the IP address or domain name of the VPN server.
- In the “Account Name” field, enter your username.
- If your VPN requires an additional setting, click on the “Authentication Settings” button and enter the necessary information, such as a password or Kerberos ticket.
- Click on the “Apply” button to save your settings.
- In the Network window, select the VPN connection you just created and click on the “Connect” button.
- Enter your password, if prompted, and click “Connect”.
- Your Mac will establish a connection to the VPN and you will be able to access the remote network as you normally would.
Troubleshooting VPN Connection Issues on Mac OS X
If you are experiencing VPN connection issues on your Mac OS X, there are several troubleshooting steps you can take to resolve the problem. Here are some suggestions to help you get your VPN connection up and running smoothly:
1. Check your network connection
Before attempting to connect to the VPN, make sure that your Mac is connected to a reliable network. Ensure that you have a stable internet connection and that there are no issues with your Wi-Fi or Ethernet connection.
2. Verify your VPN settings
Double-check your VPN settings to ensure that everything is configured correctly. Go to the Network section in System Preferences, select the VPN connection you want to troubleshoot, and click on the “Advanced” button. From there, you can verify the settings such as the VPN type (PPTP, L2TP/IPSec, or OpenVPN), server address, and authentication method.
3. Update your VPN client
If you are using a separate VPN client, make sure that it is up to date. Check for any available updates and install them if necessary. Outdated VPN clients may cause compatibility issues and result in connection problems.
4. Restart your Mac and modem/router
Sometimes a simple restart can resolve VPN connection issues. Restart your Mac, as well as your modem or router, to refresh the network settings and clear any temporary glitches that may be causing the problem.
5. Try a different VPN protocol
If you are using a VPN client that supports different VPN protocols, such as OpenVPN or L2TP/IPSec, try switching to a different protocol to see if that resolves the issue. Some ISPs may block certain VPN protocols, so trying a different one can help establish a successful connection.
6. Contact your VPN provider
If you have gone through the above troubleshooting steps and are still unable to connect to the VPN, reach out to your VPN provider for further assistance. They can provide additional guidance and troubleshoot the issue on their end.
By following these troubleshooting steps, you should be able to resolve most VPN connection issues on your Mac OS X. Remember to check your network connection, verify your VPN settings, update your VPN client if necessary, restart your Mac and modem/router, try a different VPN protocol, and contact your VPN provider for further support if needed.
How do I use Mac OS X to connect with VPN?
The process of using VPN on a Mac OS X is fairly straightforward. You will need a VPN client installed on your Mac to establish a connection with the VPN network.
To start, enable the VPN option on your Mac by navigating to the Network settings under System Preferences. In this menu, you will find a separate option for VPN, where you can configure and manage your VPN connections.
Step 1: Open the Network settings in System Preferences.
Step 2: Choose the “+” button at the bottom left to add a new VPN configuration.
Step 3: In the drop-down menu, select the type of VPN you are connecting to. Mac OS X supports various VPN protocols such as IPSec, L2TP, PPTP, and Cisco VPN.
Step 4: Enter the necessary details for the VPN connection, including the server address, account username, and any additional settings required by the VPN provider.
Step 5: Save the configuration and close the Network settings.
Once the VPN connection has been set up, you can connect to the VPN network by clicking on the VPN icon in the menu bar and selecting the VPN connection you want to use. You may be prompted to enter your VPN password.
Note: Depending on the VPN service you are using, you may need to install and configure additional software or certificates to establish a secure connection. Make sure to follow the instructions provided by your VPN provider.
Вопрос-ответ:
What is VPN and why should I use it?
VPN stands for Virtual Private Network, it is a secure connection that allows you to browse the internet privately and securely. Using a VPN can help protect your online privacy, secure your connection, and bypass restrictions or censorship.
Can I set up a VPN on my Mac OS X?
Yes, Mac OS X has built-in support for VPN. You can easily set up and configure a VPN connection on your Mac.
Which VPN protocols are supported on Mac OS X?
Mac OS X supports various VPN protocols including PPTP, L2TP/IPsec, and Cisco IPSec. You can choose the protocol that works best for your needs.
Is it safe to use VPN on Mac OS X?
Using VPN on Mac OS X is generally safe as it encrypts your internet traffic and protects your online privacy. However, it’s important to choose a reliable VPN provider that takes security seriously.
Can I use a free VPN on Mac OS X?
Yes, there are free VPN options available for Mac OS X. However, it’s important to note that free VPNs often have limitations, such as a limited number of servers, slower connection speeds, and potential privacy concerns. Paid VPNs usually offer better performance and more features.
Can I use VPN to access geo-restricted content?
Yes, by connecting to a VPN server in a different country, you can bypass geo-restrictions and access content that is not available in your location. However, it’s important to respect the content licensing agreements and use VPNs for legal purposes.
Видео:
Mac Free VPN Setup | Without Software |
Mac Free VPN Setup | Without Software | by PcMac 4 years ago 14 minutes, 10 seconds 280,340 views