How to Install Cisco AnyConnect Secure Mobility Client on a Mac Computer – Step-by-Step Guide

In this article, we will provide step-by-step instructions on how to install the Cisco AnyConnect Secure Mobility Client on a Mac computer. The Cisco AnyConnect Secure Mobility Client is a software that allows users to securely connect to the University’s network through a VPN. It provides enhanced security and identity protection for your mobile devices.
Prerequisites:
Before starting the installation process, make sure you have the latest version of the Cisco AnyConnect Secure Mobility Client for Mac. You can download the software from the University’s website.
Also, check if you have the applicable licensing and permissions to install and use the Cisco AnyConnect Secure Mobility Client.
Instructions:
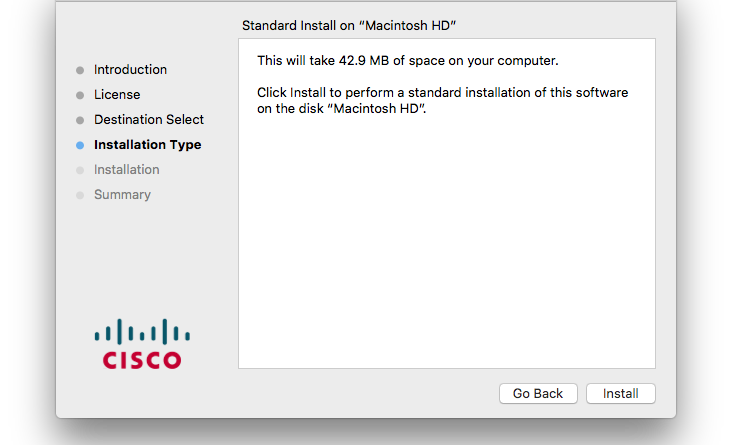
- Double-click on the downloaded file to start the installation process.
- Follow the on-screen instructions to install the Cisco AnyConnect Secure Mobility Client. If any licenses need to be accepted, read them carefully and click “Agree” if you agree with the terms.
- Once the installation is complete, locate the Cisco AnyConnect Secure Mobility Client in your applications folder or through Spotlight search.
- Open the Cisco AnyConnect Secure Mobility Client by double-clicking on it.
- In the Cisco AnyConnect window, enter the VPN server address provided by the University’s IT department and click “Connect”.
- If prompted, enter your University login credentials to establish a secure connection.
- The Cisco AnyConnect Secure Mobility Client will now connect to the University’s network, providing you with secure access to resources, help desk support, and more.
By following these installation instructions, you will be able to install and use the Cisco AnyConnect Secure Mobility Client on your Mac computer for secure and reliable VPN access to the University’s network.
Install AnyConnect Secure Mobility Client
To install the AnyConnect Secure Mobility Client on your Mac computer, you will need to follow the instructions provided below.
Step 1: Download the Client
In order to install the AnyConnect Secure Mobility Client, you will first need to download the latest version of the client from the Cisco website. To do this, open your internet browser and navigate to the Cisco website. Once there, locate and click on the download link for the AnyConnect Secure Mobility Client.
Step 2: Install the Client
Once you have downloaded the AnyConnect Secure Mobility Client, locate the installation file on your computer and double-click on it to begin the installation process. A window will open with the installation instructions.
Step 3: Follow the Installation Instructions
Follow the on-screen instructions to complete the installation of the AnyConnect Secure Mobility Client. You may need to provide additional information or agree to certain licensing terms, so be sure to read through the instructions carefully.
Step 4: Connect to the VPN
After the installation is complete, open the AnyConnect Secure Mobility Client app. You will need to enter the necessary VPN connection information in order to connect. This information may include the server address, username, and password. Once you have entered the necessary information, click the “Connect” button to establish the VPN connection.
Step 5: Verify the Connection Status
Once the connection is established, you can verify the connection status by checking the AnyConnect Secure Mobility Client app. It should display the current connection status, such as “Connected” or “Disconnected”. If there are any issues with the connection, refer to the AnyConnect Secure Mobility Client documentation or contact your university’s Information Technology department for further assistance.
By following these steps, you will be able to successfully install and connect to the AnyConnect Secure Mobility Client on your Mac computer. The AnyConnect Secure Mobility Client provides a secure and reliable VPN technology for use with Cisco devices, ensuring the privacy and security of your data and identity.
Links to Other IT Groups
Downloading the Software
If you are looking to download a specific version of the Cisco AnyConnect Secure Mobility Client, you can find it on the Cisco website. Simply follow the appropriate link for your operating system (OS).
Installation Instructions
Once you have downloaded the AnyConnect client software, you can refer to the installation instructions provided on the Cisco website. These instructions will guide you through the installation process.
More Resources and Help
If you need more information or assistance with the AnyConnect client, you can find additional resources and help on the Cisco website. This includes licensing information, troubleshooting guides, and FAQs.
University Helpdesk
If you are a university user and require assistance with the AnyConnect client, you can reach out to the university helpdesk. They can provide support and guidance for installation, configuration, and troubleshooting.
Checking the Status of AnyConnect
To check the status of AnyConnect and its licenses, you can open the AnyConnect client on your computer. The client window will provide information about the current connection status and licensing details.
Connecting to Other IT Groups
If you would like to connect with other IT groups and discuss AnyConnect or other IT topics, there are various online groups and forums available. You can search for these groups on the internet and join the discussions.
University Information Technology
Installing Cisco AnyConnect Secure Mobility Client
To ensure the latest and most secure software is installed on your Mac, you can use the Cisco AnyConnect Secure Mobility Client. This software will help you connect to the university’s network through a VPN in order to access resources like the library, calendar, and more.
Installation Instructions
- Click on the App Store icon in your Mac’s dock to open the App Store.
- Search for “Cisco AnyConnect” in the search bar and click on the Cisco AnyConnect Secure Mobility Client app.
- Click on the “Download” button to begin the download process.
- Once the app is downloaded and installed, go to your Applications folder and open the Cisco folder.
- Double-click on the “AnyConnect” app to launch the client.
- When the app opens, click on the “Connect” button to establish a secure VPN connection.
- Enter the necessary information, such as the server address and your university network credentials, when prompted.
- Once connected, you will have access to university resources and your connection status will be displayed in the client window.
Licensing and Maintenance
In order to use Cisco AnyConnect Secure Mobility Client, your university may have specific licensing requirements. Please check with your university’s IT department or helpdesk for more information on obtaining licenses and any maintenance or support options that may be available.
Additional Resources
If you need further assistance or encounter any issues with the installation or usage of Cisco AnyConnect Secure Mobility Client, please refer to the documentation and support resources provided by Cisco. These resources can be found on the Cisco website and may include FAQs, user guides, and troubleshooting tips.
Mobile Version
Cisco AnyConnect Secure Mobility Client is also available for mobile devices running iOS or Android. You can download the app from the respective app stores and follow similar instructions to install and configure the client on your mobile device.
IT Helpdesk
Introduction
IT Helpdesk is a valuable resource for users who need assistance with various technology-related issues. Whether you are having trouble connecting to a network, installing software, or need help with your Mac computer, the IT Helpdesk is there to provide support and solutions.
Objective
The objective of the IT Helpdesk is to assist users in resolving their technology-related problems. Whether it’s troubleshooting network connectivity, guiding users through software installation, or providing additional resources, the Helpdesk is dedicated to helping users with their IT needs.
How to Connect with the IT Helpdesk
If you need help, follow these steps:
- On your Mac computer, click on the App Store icon.
- In the search field, type “Cisco AnyConnect Secure Mobility Client” and press Enter.
- Select the Cisco AnyConnect Secure Mobility Client app from the search results.
- Click on the “Get” button to download the app.
- Once downloaded, double-click on the installer to begin the installation process.
After installation, you will need to connect to the IT Helpdesk through the Cisco AnyConnect Secure Mobility Client. To do this:
- Open the Cisco AnyConnect Secure Mobility Client.
- In the text field, enter the URL provided by the IT Helpdesk.
- Click on the “Connect” button.
Once the Cisco AnyConnect Secure Mobility Client connects, a new window will open with additional information and resources.
Additional Resources
Below are some additional resources and links that may be applicable:
- IT Helpdesk articles and instructions
- Cisco AnyConnect Secure Mobility Client licensing
- Latest version of Cisco AnyConnect Secure Mobility Client
If you still need help, you can contact the IT Helpdesk for further assistance. They are available to help you resolve any technology-related issues you may encounter.
Need Help
If you need help with installing the Cisco AnyConnect Secure Mobility Client on your Mac computer, follow the step-by-step instructions below.
Step 1: Prerequisites
Before installing the Cisco AnyConnect client, make sure you have the following prerequisites:
- A Mac computer
- An internet connection
Step 2: Download and Install
- Go to the university’s website or library resources to download the Cisco AnyConnect client software.
- Once downloaded, the installation file will appear in your downloads folder.
- Double-click the file to begin the installation process.
- Follow the on-screen instructions to complete the installation.
Step 3: Connect to the Network
Once the Cisco AnyConnect client is installed, you can use it to connect to the university’s network:
- Open the Cisco AnyConnect app.
- Enter the university’s VPN server address in the appropriate field.
- Click “Connect” to establish a connection.
Step 4: Get Help
If you encounter any issues during the installation or connection process, there are several resources you can check for help:
- The university’s IT helpdesk
- Online articles and objective information
Additional Tips and Information
- The Cisco AnyConnect client provides additional security and mobility features for connecting to the university’s network.
- Make sure you have the necessary licenses or licensing information for using the Cisco AnyConnect client.
- For maintenance or software updates, check the Cisco website for the latest information.
- If you want to connect to the university’s network from other devices, like smartphones or tablets, you can download the Cisco AnyConnect client from the respective app store.
- The Cisco AnyConnect client is compatible with a wide range of devices and operating systems, including Mac computers.
In conclusion
Installing and using the Cisco AnyConnect Secure Mobility Client on your Mac computer is an essential step in accessing the university’s network and resources.
If you encounter any difficulties during the installation or connection process, don’t hesitate to seek help from the university’s IT department or online resources.
Install Cisco AnyConnect Secure Mobility Client on a Mac Computer
The installation process for the Cisco AnyConnect Secure Mobility Client on a Mac computer is straightforward. Before starting the installation, make sure your operating system is up to date and meets the necessary prerequisites.
Prerequisites:
- Mac computer running a compatible operating system
- Administrator access to the computer
- Stable internet connection
1. Obtain the Cisco AnyConnect Secure Mobility Client software. You can download it from the university’s website or through other applicable sources.
2. Once the software is downloaded, locate the installer file. It is usually found in the Downloads folder or in your browser’s default download location.
3. Double-click the installer file to start the installation process. You may be prompted to enter your administrator password.
4. The installation window will appear. Follow the on-screen instructions to complete the installation. You may need to agree to the software license agreement and choose the installation location.
5. After the installation is complete, open the Cisco AnyConnect Secure Mobility Client app. It should be located in the Applications folder.
6. In the Cisco AnyConnect window, click on “Connect”. Enter the necessary information provided by your network administrator, such as the VPN server address and your credentials.
7. You are now connected to the secure network through Cisco AnyConnect Secure Mobility Client. You can verify your connection by checking the AnyConnect icon in the menu bar.
If you encounter any issues during the installation or need further assistance, consult the university’s help articles or contact the helpdesk for support.
Connect to VPN
To connect to the VPN, you will need to install the Cisco AnyConnect Secure Mobility Client on your Mac computer. This client allows you to securely connect to the university network from off-campus locations.
Installation
Before you can connect to the VPN, you will need to download and install the Cisco AnyConnect Secure Mobility Client. You can do this by following the instructions provided below:
- Go to the university IT helpdesk website.
- Click on the “Software & Downloads” link.
- Find the Cisco AnyConnect Secure Mobility Client and click on the download link.
- Once the file has been downloaded, open it to start the installation process.
- Follow the on-screen instructions to complete the installation.
Connect to VPN
Once you have installed the Cisco AnyConnect Secure Mobility Client, you can use it to connect to the VPN by following these steps:
- Open the AnyConnect app on your Mac computer.
- In the “Connect” field, enter the VPN address or server name provided by your IT helpdesk.
- Click on the “Connect” button to initiate the connection.
- If prompted, enter your university network username and password.
- Once connected, you will see the status change to “Connected”.
You are now securely connected to the university network through the VPN. You can access resources and use services that are only available on the university network.
Additional Information
If you need additional help or information regarding the VPN installation or configuration, check the university IT helpdesk website. They have useful articles and resources that can assist you with any VPN-related issues.
If you encounter any problems or need further assistance, you can also contact the university IT helpdesk directly. They will be able to provide you with personalized instructions and support.
AnyConnect Software Version Instructions
If you are looking to install Cisco AnyConnect Secure Mobility Client on your Mac computer, you will need to follow these instructions to ensure a successful installation.
1. Check Your License
Before installing the software, make sure you have the necessary licenses. The software opens up new possibilities for your network, but you need to have the right licenses in place to use it. If you are unsure about your licensing status, contact your university’s IT helpdesk for assistance.
2. Download the Latest Version
Visit the Cisco website or university IT resources to download the latest version of the AnyConnect software. Make sure to select the appropriate version for your Mac OS. Downloading the latest version ensures that you have the most up-to-date features and security enhancements.
3. Follow the Installation Instructions
Once the software is downloaded, follow the installation instructions provided. You may need to go through a series of prompts and windows to complete the installation process. Make sure to read each step carefully and select the appropriate options.
4. Connect to Your Network
After the installation is complete, launch the AnyConnect client app. The client provides a secure and convenient way to connect to your university’s network. Enter your credentials and select your desired group or objective. You can also connect to other networks if needed.
5. Additional Resources and Help
If you need more information or help with the installation or use of AnyConnect software, check out the Cisco website or your university’s IT resources. They provide helpful articles, links, and support options to assist you with any questions or issues you may have.
In conclusion, installing Cisco AnyConnect Secure Mobility Client on your Mac computer requires checking your license status, downloading the latest version, following the installation instructions, and connecting to your network. Additional resources and help are available for more information and support.
Applicable Devices Software Version
Introduction
The Cisco AnyConnect Secure Mobility Client is a software that provides VPN (virtual private network) access to your network from remote locations. It is available for download on Mac computers and is compatible with the Cisco RV34x series routers.
Applicable Devices
This software version is applicable for the following devices:
- Cisco RV34x series routers
Software Version
You will need to download and install the Cisco AnyConnect Secure Mobility Client version X on your Mac computer. This software can be downloaded from the Cisco website. Make sure to check for the latest version available.
Installation Prerequisites

Before installing the Cisco AnyConnect Secure Mobility Client on your Mac computer, make sure you have the following prerequisites:
- Valid licensing for the Cisco RV34x series router
- Administrator access to your Mac
- Internet connectivity
Installation Steps
To install the Cisco AnyConnect Secure Mobility Client on your Mac computer, follow these steps:
- Download the installation file from the Cisco website. The file will have an extension of .dmg.
- Locate the downloaded file on your Mac, usually in the “Downloads” folder.
- Double-click the .dmg file to open it. A new window will appear with the Cisco AnyConnect Secure Mobility Client installation package.
- Drag the Cisco AnyConnect Secure Mobility Client icon to the Applications folder to install the software.
- Open the Applications folder and locate the Cisco AnyConnect Secure Mobility Client.
- Double-click the Cisco AnyConnect Secure Mobility Client to open the application.
- In the Cisco AnyConnect Secure Mobility Client window, enter the VPN address provided by your network administrator.
- Click “Connect” to establish a VPN connection to your network.
- If prompted, enter your network username and password.
- The Cisco AnyConnect Secure Mobility Client will open on your Mac and display the connection status.
Additional Resources
For more information and useful articles on the Cisco AnyConnect Secure Mobility Client installation and usage, including troubleshooting tips and licensing information, you can visit the Cisco support website. There you can find links to helpful resources like user guides, FAQs, and more.
Cisco AnyConnect VPN Client for Mac
The Cisco AnyConnect VPN Client is a software application that allows users to securely connect to a virtual private network (VPN). In this guide, we will provide information on how to install the Cisco AnyConnect Secure Mobility Client on a Mac computer.
To install the Cisco AnyConnect VPN Client on your Mac, you will first need to download it from the Cisco website or through the App Store. Once downloaded, the installation process will appear on your screen.
Before you begin the installation process, it is important to check the prerequisites for using the Cisco AnyConnect VPN Client. This information can be found below the installation instructions. Make sure you have the necessary software and licensing in order to connect.
To start the installation, double-click on the downloaded file. This will open the installer, which will guide you through the installation process. Follow the on-screen instructions to complete the installation.
After the installation is complete, the Cisco AnyConnect VPN Client will appear in your Applications folder. You can open it by searching for “Cisco AnyConnect” in Spotlight or by navigating to the Applications folder in Finder.
Once the Cisco AnyConnect VPN Client is open, you will need to enter your VPN credentials to connect. This includes your username and password, as well as any other additional information provided by your IT department or helpdesk.
If you are using a Cisco RV34x series router, additional configuration steps may be necessary. This information can be found in the resources provided by Cisco, including the user manual and online documentation.
In summary, the Cisco AnyConnect VPN Client for Mac is a useful tool for connecting to a secure VPN network. By following the installation instructions and checking the prerequisites, you can easily install and use the client on your Mac computer.
Maintenance Calendar
If you are a mobile VPN user, then it is important to be aware of any scheduled maintenance that may affect your internet connection. The maintenance calendar provides a handy resource to check for any upcoming maintenance windows.
Objective
The objective of the maintenance calendar is to provide users with information about scheduled network maintenance. This information is crucial for planning and ensuring uninterrupted access to internet resources.
Installation
If you have the Cisco AnyConnect Secure Mobility Client installed on your Mac computer, then you can access the maintenance calendar using the following instructions:
- Open the Cisco AnyConnect Secure Mobility Client software
- Click on the “x” button to close the connection window (if it appears)
- Double-click on the Cisco AnyConnect Secure Mobility Client icon to open the application
- Enter your username and password and click “Connect”
Using the Maintenance Calendar
Once you are connected to the VPN, you can access the maintenance calendar by following these steps:
- Open a web browser and navigate to the URL: http://vpn.calendar.com
- Log in using your VPN username and password
- Click on the “Maintenance Calendar” link
- Below the calendar, you will find resources and additional information about the maintenance windows
Helpdesk and Support
If you need additional help or have any questions about the installation or use of the Cisco AnyConnect Secure Mobility Client, please contact the IT helpdesk. They can provide further instructions and troubleshoot any issues you may encounter.
Additional Resources
In addition to the information provided in the installation guide, there are several other useful resources available for installing and using Cisco AnyConnect Secure Mobility Client on a Mac computer:
- Prerequisites: Before installing the AnyConnect client, make sure you have the necessary software and licensing information. This includes having the appropriate version of macOS installed on your device and access to Cisco’s software downloads.
- Installation Guide: Cisco provides a detailed installation guide for the AnyConnect client on their website. This guide walks you through the installation process step by step, including how to download and install the client software on your Mac.
- Helpdesk Support: If you encounter any issues during the installation process or need further assistance, the University’s IT helpdesk is available to provide support and troubleshooting.
- AnyConnect Mobile Devices: The AnyConnect client is not only applicable to Mac computers, but also to mobile devices running on iOS and Android operating systems. If you have multiple devices, such as an iPhone or iPad, you can continue to use the AnyConnect client to connect to the University’s secure network.
- Additional Cisco Resources: Cisco’s website provides a wealth of resources on using the AnyConnect client, including guides, tutorials, and troubleshooting tips. These resources can be helpful for both new and experienced users.
By utilizing these additional resources, you can ensure a smooth and successful installation of the AnyConnect Secure Mobility Client on your Mac computer. With this secure VPN client, you can connect to the University’s network and access the necessary resources for your work or studies.
Cisco AnyConnect VPN Installation for Mac OS X
Introduction:
The Cisco AnyConnect VPN provides a secure way for users to access resources on the University network. In order to install the Cisco AnyConnect Secure Mobility Client on a Mac computer running OS X, you will need to follow the steps outlined below.
Step 1: Download the Cisco AnyConnect VPN Client
To download the software, go to the University Information Technology website and navigate to the “VPN” section. Look for the appropriate version of the Cisco AnyConnect VPN Client for Mac OS X and click on the download link. Once the file is downloaded, open it to begin the installation.
Step 2: Install the Cisco AnyConnect VPN Client
After the installation file opens, follow the on-screen instructions to install the Cisco AnyConnect Secure Mobility Client. You may be prompted to enter your Mac OS X login credentials in order to proceed with the installation.
Step 3: Launch the Cisco AnyConnect VPN Client
Once the installation is complete, you will need to launch the Cisco AnyConnect Secure Mobility Client. Look for the application in your Applications folder or use Spotlight to search for it.
Step 4: Connect to the University Network
When the Cisco AnyConnect VPN Client opens, you will see a window with a field to enter the VPN server address. Enter the appropriate server address and click “Connect”. You may also need to enter your University username and password in order to establish a secure connection.
Step 5: Verify Connection Status
After connecting to the University network, you can verify the status of your VPN connection by checking the Cisco AnyConnect VPN Client. It should indicate that you are connected. If you have any issues, you can refer to the Cisco AnyConnect VPN installation articles for troubleshooting assistance.
In conclusion, the installation of the Cisco AnyConnect VPN Client on a Mac computer running OS X is a straightforward process. By following the steps outlined above, users can easily install and configure the VPN client to access University resources securely.
Objective
The objective of this article is to provide instructions on how to install Cisco AnyConnect Secure Mobility Client on a Mac computer. Cisco AnyConnect is a client that provides secure remote access to a network for Mac users. If you work in an IT or security-related role at the university, you may need to install this client on your Mac in order to connect to the university’s network. This client is also useful for other users who want to connect to the university’s network from their Mac devices. The installation process involves downloading and installing the Cisco AnyConnect client, as well as checking the licensing status of the client.
Introduction and Resources
Before installing Cisco AnyConnect, it is important to familiarize yourself with the resources and instructions applicable to your Mac version. The university’s IT website is a valuable resource that provides detailed instructions and articles on various topics, including the installation of AnyConnect on Mac. You can find these resources in the university’s IT library or by searching the IT calendar for any applicable training sessions. Once you have the necessary resources, you can proceed with the installation process.
Installing Cisco AnyConnect Secure Mobility Client
To install Cisco AnyConnect on your Mac, you will need to follow a series of steps. Double-click on the AnyConnect installer file that you downloaded. A pop-up window will appear, prompting you to click “Continue.” Follow the instructions in the installer, including accepting the license agreement. You may be asked to enter your Mac’s password to grant permission for the installation. Once the installation is complete, you can check the status of the AnyConnect client.
Checking Licensing Status and Additional Configuration
After the AnyConnect client is installed, you can check the licensing status through the AnyConnect app. Open the app and click on the gear icon in the top right corner of the window. From the drop-down menu, select “License.” This will display information about the licensing status of the client. If you encounter any licensing issues, it is recommended to contact the university’s helpdesk for assistance.
In addition to checking the licensing status, you may also want to configure additional settings for the AnyConnect client. This includes setting up mobile and group settings, as well as configuring identity and network settings. The university’s IT website provides detailed instructions on how to perform these configuration steps.
By following these steps, you will be able to successfully install Cisco AnyConnect Secure Mobility Client on your Mac computer and connect to the university’s network securely.
Check these other articles out
If you are looking for more information on software installation, you can download the Cisco AnyConnect Secure Mobility Client through the university’s library. The installation instructions will guide you through the process on a Mac computer.
In addition to the software download, you can also find information on licensing and how to connect to the university’s network using the Cisco AnyConnect Secure Mobility Client. This information is applicable for both Mac and Windows clients.
If you need further assistance with the installation process, you can contact the university’s helpdesk for more information. They can provide guidance on any specific issues you may encounter during the installation process.
For more information on Cisco AnyConnect Secure Mobility Client and its features, check out the Introduction to Cisco AnyConnect Secure Mobility Client article. This article provides an overview of the software and its functionality.
If you want to continue with the installation, follow the below steps:
- Open the downloaded file from the Cisco website or through the university’s library.
- Click on the “Connect” button to open the installation window.
- Follow the on-screen instructions to complete the installation process.
Once the installation is complete, the Cisco AnyConnect Secure Mobility Client will appear in the Applications folder on your Mac. You can open the application and connect to the university’s network using your Cisco AnyConnect Secure Mobility Client login credentials.
If you encounter any issues with the installation or licensing status, make sure to check the Cisco website for more information. They provide resources and troubleshooting guides to help you resolve any problems.
Download
If you want to install Cisco AnyConnect Secure Mobility Client on your Mac computer, you will need to download the software from the Cisco website. This client provides a secure connection to your network and can be used on various devices, including mobile devices.
To download the Cisco AnyConnect Secure Mobility Client, you can visit the Cisco website and navigate to the “Downloads” section. There, you will find the latest version of the client for Mac OS. Click on the download link to start the process.
Before downloading, make sure to check the instructions and any additional information applicable to your specific installation. The website may provide useful articles, resources, and installation guides to help you with the process.
Once the file has been downloaded, open it to start the installation. Follow the on-screen instructions to continue the installation process. You may be prompted to enter your Cisco licensing information, so make sure to have that information ready.
After the installation is complete, you will be able to use the Cisco AnyConnect Secure Mobility Client on your Mac computer. This client provides a secure connection to your network, allowing you to access resources and services. It is particularly useful for remote work and connecting to your organization’s network while on the go.
AnyConnect App

The AnyConnect App is a mobile client software provided by Cisco for secure network connectivity. This app is available for installation on Mac computers, and it allows users to connect to secure networks, ensuring the privacy and security of their data.
Before installing the AnyConnect App, it is important to follow certain prerequisites. Users should ensure they have the necessary licenses and permissions to install the software. They should also make sure they have the latest version of the Cisco AnyConnect Secure Mobility Client downloaded, which can be obtained from the University Information Technology website.
Once the software is downloaded, users can proceed with the installation process. They can double-click on the downloaded file to start the installation. During the installation, users will be prompted to follow the instructions provided on the screen. It is important to carefully read and follow these instructions to ensure a successful installation.
After the installation is complete, users can find the AnyConnect App in their Applications folder. To connect to a secure network, users can launch the AnyConnect App and enter the necessary credentials. The app provides a user-friendly interface that allows users to easily connect to the network with just a few clicks.
The AnyConnect App offers a range of features to enhance the security and identity protection of users. It provides secure access to resources on the network, ensuring that sensitive data remains protected. It also allows users to connect to different networks, such as the university network, through a single app.
In addition to network connectivity, the AnyConnect App also provides users with access to resources such as the University Information Technology Helpdesk. Users can find helpful articles, instructions, and other resources in the app’s library. They can also view the status of their network connection and perform maintenance tasks.
Overall, the AnyConnect App is a secure and reliable solution for users who require secure network connectivity on their Mac computers. Whether connecting to the university network or other secure networks, this app provides the necessary tools and security features to ensure a safe and efficient connection.
Useful links
If you need to install the Cisco AnyConnect Secure Mobility Client on your Mac computer, follow these useful links:
- Prerequisites: Before you can install the Cisco AnyConnect Secure Mobility Client, make sure you have the necessary software and licenses. You can find more information about the prerequisites in the Cisco AnyConnect Secure Mobility Client Installation Guide for Mac OS.
- Download: Download the latest version of the Cisco AnyConnect Secure Mobility Client from the Cisco website. Make sure to choose the version that is applicable for your operating system.
- Installation: Once the file is downloaded, double-click on it to start the installation process. Follow the instructions provided to install the Cisco AnyConnect Secure Mobility Client on your Mac.
- Licensing: If you are a University user, you may need to obtain licenses for the Cisco AnyConnect Secure Mobility Client. You can find more information about licensing and how to obtain licenses in the Cisco AnyConnect Secure Mobility Client Installation Guide for Mac OS.
- Other resources: If you encounter any issues during the installation process or need further assistance, you can refer to the Cisco AnyConnect Secure Mobility Client Installation Guide for Mac OS. Additionally, the Cisco website provides a library of useful articles and a series of videos that can help you with the installation and maintenance of the Cisco AnyConnect Secure Mobility Client.
Once the Cisco AnyConnect Secure Mobility Client is installed, you can connect to the University network by opening the application and entering the necessary information. Make sure to follow the instructions provided by your IT department.
In order to continue using the Cisco AnyConnect Secure Mobility Client, make sure to check for updates regularly. Cisco releases new versions of the software with bug fixes and security enhancements. You can check for updates through the Cisco AnyConnect Secure Mobility Client, or by visiting the Cisco website.
It is important to note that the installation and use of the Cisco AnyConnect Secure Mobility Client may vary depending on your specific IT environment. Consult with your IT department or refer to the Cisco AnyConnect Secure Mobility Client Installation Guide for Mac OS for more specific information.
Prerequisites
Before you can install Cisco AnyConnect Secure Mobility Client on your Mac computer, you will need to ensure that you meet the following prerequisites:
- A Mac computer: Cisco AnyConnect Secure Mobility Client is compatible with Mac OS X, so you will need a Mac computer to install and use the client.
- An internet connection: In order to download the installation file for Cisco AnyConnect Secure Mobility Client, you will need to have an active internet connection on your Mac computer.
- Administrative privileges: You will need administrative privileges on your Mac computer in order to install software.
- Enough disk space: Make sure that you have enough free disk space on your Mac computer to accommodate the installation of Cisco AnyConnect Secure Mobility Client. The exact amount of disk space required will vary depending on the version of the client you are installing.
- AnyConnect Secure Mobility Client installation file: You will need to download the Cisco AnyConnect Secure Mobility Client installation file from the appropriate source. This file will usually be provided by your university’s IT department or can be downloaded from the Cisco website.
Licensing Information
Before installing the Cisco AnyConnect Secure Mobility Client on your Mac computer, it is important to understand the licensing requirements and obtain the necessary licenses for your organization. This licensing information will guide you through the process and ensure that you have the appropriate permissions and access to the client software.
To install the Cisco AnyConnect Secure Mobility Client, you will need to download the appropriate installation file from the Cisco website. This file contains the necessary software and resources for the client to function properly on your Mac computer. You can find the latest version of the client software on the Cisco website, which provides secure connections and identity verification for users accessing your network remotely.
Once you have downloaded the installation file, double-click on it to open the installation window. Follow the on-screen instructions to continue with the installation process. During the installation, you may be prompted to provide your licensing information. This information will typically be provided by your organization’s IT department or helpdesk, and it will be specific to your organization’s licensing agreement with Cisco.
If you have any questions or need more information about the licensing requirements or how to obtain the necessary licenses, you should consult with your organization’s IT department or helpdesk. They will be able to provide you with the specific instructions and resources you need to ensure that you are installing the Cisco AnyConnect Secure Mobility Client with the correct licensing for your organization.
It is important to note that the Cisco AnyConnect Secure Mobility Client is applicable for both individual users and groups within your organization. If you are installing the client software for multiple devices or users, you may need to obtain additional licenses to ensure that everyone has the necessary permissions and access to the client.
For more information on licensing and installation instructions for the Cisco AnyConnect Secure Mobility Client on a Mac computer, check the Cisco website or consult the documentation and resources provided with the client software. These resources will provide you with the most up-to-date and relevant information for your specific licensing needs.
Вопрос-ответ:
What is Cisco AnyConnect Secure Mobility Client?
Cisco AnyConnect Secure Mobility Client is a software application that provides VPN (Virtual Private Network) services for secure remote access to a network. It allows users to connect to a network securely over the internet, giving them access to network resources and ensuring their data remains encrypted and protected.
Why would I need to install Cisco AnyConnect Secure Mobility Client on a Mac computer?
You would need to install Cisco AnyConnect Secure Mobility Client on a Mac computer if you need to access a network remotely and require a secure connection. This could be necessary for employees who work from home or travel frequently and need to access company resources securely. It can also be used by students or faculty who need to connect to university networks securely from off-campus locations.
Can I use Cisco AnyConnect Secure Mobility Client on a different operating system?
Yes, Cisco AnyConnect Secure Mobility Client is available for multiple operating systems, including Windows, macOS, Linux, iOS, and Android. This allows users to connect securely to a network using their preferred device and operating system.
Is Cisco AnyConnect Secure Mobility Client free to use?
No, Cisco AnyConnect Secure Mobility Client is not a free application. It is a licensed software that requires a valid license to use. Organizations typically purchase licenses for their employees or provide access to the client through their network infrastructure. Some universities or institutions may provide access to the client for their students and faculty members.
Видео:
cisco AnyConnect establishing vpn – activating vpn adapter error solution 30 seconds
cisco AnyConnect establishing vpn – activating vpn adapter error solution 30 seconds by THE NERDS CHAT 10 months ago 3 minutes, 22 seconds 6,149 views
DONIDCR VERSP-MIS ACCESS USING VPN
DONIDCR VERSP-MIS ACCESS USING VPN by Marsyangdi Rural Municipality 4 months ago 8 minutes, 19 seconds 722 views